
Back of the napkin sketch – prototype 3
Posted in Design Projects, tagged boxes, furniture, process on February 9, 2012| Leave a Comment »
Back of the napkin sketch – prototype 3
Posted in Found Objects, tagged artisan siding, fibercement, fibercement siding, miter, mitered corner, process, redwood, redwood siding, siding, window trim, windows, wood on January 17, 2012| Leave a Comment »

fibercement mitered corner

hobbit lurking in the sun

A bit of redwood siding after all that fibercement
Posted in Design Projects, tagged furniture, paperstone, process, richlite on May 8, 2011| Leave a Comment »
While I was working on this piece, the Royal Wedding occurred in England. Queen Elizabeth was praised by the press for the “timeless elegance” of her cheerful yellow suit and matching hat. It is proper for a queen to be dignified yet approachable. Reading about the contrast between the queen’s attire and the more modern styles that were worn by other guests reminded me of the contrast between my two recent furniture projects. The yellow corner cabinet is cheerful and whimsical, while the simple, black, angular lines of the TV cabinet speak a different language.

It has been a complex design and assembly process, accommodating various components and cords, but it is almost finished.

One more coat of polish, and then we deliver and install.
Posted in Design Projects, Information, tagged houses, process, San Francisco on May 5, 2011| Leave a Comment »

Architect measuring the back stairs
I’ve been busy starting a few new projects the past couple of weeks. All three projects are small additions on the back of houses; one in San Francisco, one in Livermore, and one in Richmond.
Measuring a house can be tedious, so I often begin with just the basic dimensions and information essential for the project. I can always verify and fill in details later as needed. Beyond breaking the task into manageable bites, this strategy also keeps initial costs down. This is good if the project is uncertain and the client has hired me in part to determine feasibility. Thoroughly photographing the building is very helpful. It is hard to catch everything, and the pictures help me clarify if a dimension doesn’t seem right. Arial photographs are also a good tool for understanding the neighborhood fabric and locating the North arrow (and more importantly South)
Besides basic dimensions, asbuilt plans should include basic structural information: sizes of studs and joists, direction of joists, and roof framing and slope; and location of the utilities, furnace, water heater, electrical panel, and, of course, the main sewer line. The location of the sewer line has been crucial in all three of these recent projects. When designing for a tight budget, it usually doesn’t make sense to relocate the main sewer line, and you need to make sure you can connect to it easily and with adequate slope.
The next step is schematic design. This is the most exciting part of almost any project. Sometimes unexpected solutions appear out of nowhere.
Posted in Design Projects, tagged Berkeley, dog, furniture, humor, isba, painted plywood, process, whimsy on April 20, 2011| 2 Comments »
 Sometimes, when working in the driveway, people stop by to check out the action. I think John is explaining the cabinet to our curious neighbor here. He now has all five boxes assembled and primed. Here are a few more pictures of the process. Even though these boxes are painted, the woven corners show through and add a nice detail. Stay tuned for the final product.


Posted in Design Projects, tagged color, drawings, furniture, process, whimsy on April 11, 2011| 1 Comment »
 John Mcbride has this piece under construction as I write. I’ll post some more photos. It is intended to complement this tiled tub surround.
Posted in Design Projects, tagged boxes, fir, furniture, process, redwood, salvaged, wood on March 26, 2011| Leave a Comment »

After gluing the box together, it needed some sanding.
——————————————>
The lid is made from two fir 2×6 scraps and a redwood 2×4 scrap that John brought home from his job site. Better than average specimens, with fairly straight, tight grain; they are probably from appearance grade stock. I did not have a planer on hand, but they were pretty straight and flat. I used my new jointer to make edges flat and perpendicular to the faces. I also used the jointer to clean up the faces. (This is usually accomplished by a planer) Then I glued and clamped them together as shown in this photo.
Posted in Design Projects, tagged furniture, process on March 22, 2011| Leave a Comment »
 We have started work on this avant-garde TV cabinet for a client in Alameda and are awaiting more sunshine to proceed. Please see this post for a 3d rendering of the piece. I am looking forward to photographing the entire project when we go to install the piece in a few weeks. Stay posted!
Posted in Design Projects, tagged box, box joint, boxes, furniture, plywood, process on March 19, 2011| Leave a Comment »
Posted in Found Objects, tagged energy efficiency, green, passive house, process on October 4, 2010| Leave a Comment »
This past Sunday I went on a tour of some cutting edge energy-efficient houses. (They are hoping to meet the Passive House Standard) These photos are of one house in San Jose (1820 Cottle Avenue) by One Sky Homes. It is a conventional, 3200 SF luxury tract home, but will need much less energy to operate. According to the Passive House calculations it will be Net Zero Energy (Solar panels on the roof will provide all the required energy)
So far the house is only partially framed, but we were able to see the advanced framing techniques coming together, including this insulated header:

The house sits a top an insulated crawlspace. This is the first insulated crawlspace I have seen myself. The point of an insulated crawlspace is that all the ducts and water lines can run through conditioned space and energy is not lost. The insulated crawlspace also eliminates some of the thermal bridging that usually occurs where house meets the foundation and the earth. Finally, the conditioned crawlspace stays clean and dry, which makes it far more pleasant when maintenance requires someone to crawl around under the house. Here is a photo looking into the crawlspace from a ventilation hole:

There is, of course, a french drain all the way around the perimeter and also a floor drain in the slab to make sure it stays nice and dry down there.
The walls are insulated concrete forms, and there is 3″ of insulation under the concrete slab as well.
Here is a photo of some of the graphics explaining the heating, cooling and ventilating system:

and another showing the anticipated energy breakdown for lighting, appliances, thermal comfort, electric car charging, and entertainment:

Posted in Design Projects, tagged doorways, El Cerrito, houses, mahogony, process, wood on September 30, 2010| Leave a Comment »
The front door was installed yesterday. Now we are working out the trim details. (Ignore the blue painters tape please)
We decided to make the fir continue all the way to the ceiling and the corner for simplicity Having a sliver of white to the right of the door and a wider sliver above would have diminished the installation. I admit some influence by the intersecting planes of Gerrit Rietveld’s Schröder House

Posted in Design Projects, tagged furniture, kitchen, process on September 28, 2010| 3 Comments »

The As-built Floorplan

The Revised Floor Plan
This upgrade includes an expanded kitchen (for a client who enjoys cooking,) modern kitchen cabinets, a lot of drawers to maximize storage, New lighting design throughout the kitchen, foyer, and living room, conversion of a large storage closet into a pantry and laundry room, incorporation of a desk area into the kitchen, elimination of an electric fireplace with two-dimensional paper bricks and a new wall mounted flat screen TV with custom entertainment cabinet below.
Here are a few pictures of the kitchen before construction:
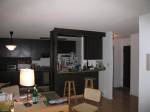

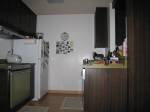

I am going to make you wait for the AFTER photos until it is finished,but here is a computer model of the new TV center to come:


